说说React服务端渲染怎么做?原理是什么?

一、是什么
在SSR中,我们了解到Server-Side Rendering ,简称SSR,意为服务端渲染
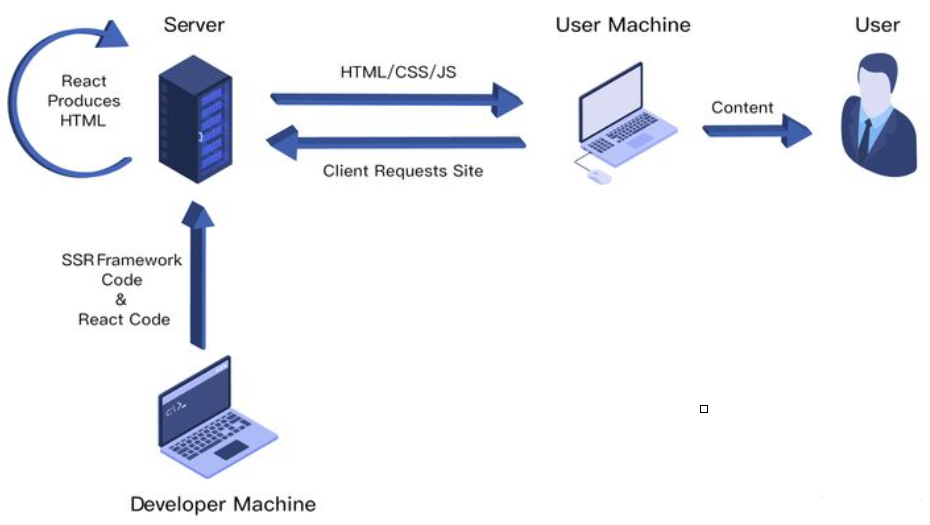
指由服务侧完成页面的 HTML 结构拼接的页面处理技术,发送到浏览器,然后为其绑定状态与事件,成为完全可交互页面的过程

其解决的问题主要有两个:
- SEO,由于搜索引擎爬虫抓取工具可以直接查看完全渲染的页面
- 加速首屏加载,解决首屏白屏问题
二、如何做
在react中,实现SSR主要有两种形式:
- 手动搭建一个 SSR 框架
- 使用成熟的SSR 框架,如 Next.JS
这里主要以手动搭建一个SSR框架进行实现
首先通过express启动一个app.js文件,用于监听3000端口的请求,当请求根目录时,返回HTML,如下:
1
2
3
4
5
6
7
8
9
10
11
12
13
14
| const express = require('express')
const app = express()
app.get('/', (req,res) => res.send(`
<html>
<head>
<title>ssr demo</title>
</head>
<body>
Hello world
</body>
</html>
`))
app.listen(3000, () => console.log('Exampleapp listening on port 3000!'))
|
然后再服务器中编写react代码,在app.js中进行应引用
1
2
3
4
5
6
7
8
9
| import React from 'react'
const Home = () =>{
return <div>home</div>
}
export default Home
|
为了让服务器能够识别JSX,这里需要使用webpakc对项目进行打包转换,创建一个配置文件webpack.server.js并进行相关配置,如下:
1
2
3
4
5
6
7
8
9
10
11
12
13
14
15
16
17
18
19
20
21
22
23
24
25
26
27
28
| const path = require('path')
const nodeExternals = require('webpack-node-externals')
module.exports = {
target:'node',
mode:'development',
entry:'./app.js',
output: {
filename:'bundle.js',
path:path.resolve(__dirname,'build')
},
externals: [nodeExternals()],
module: {
rules: [{
test: /\.js?$/,
loader:'babel-loader',
exclude: /node_modules/,
options: {
presets: ['react','stage-0',['env', {
targets: {
browsers: ['last 2versions']
}
}]]
}
}]
}
}
|
接着借助react-dom提供了服务端渲染的 renderToString方法,负责把React组件解析成html
1
2
3
4
5
6
7
8
9
10
11
12
13
14
15
16
17
18
19
| import express from 'express'
import React from 'react'
import { renderToString } from 'react-dom/server'
import Home from'./src/containers/Home'
const app= express()
const content = renderToString(<Home/>)
app.get('/',(req,res) => res.send(`
<html>
<head>
<title>ssr demo</title>
</head>
<body>
${content}
</body>
</html>
`))
app.listen(3001, () => console.log('Exampleapp listening on port 3001!'))
|
上面的过程中,已经能够成功将组件渲染到了页面上
但是像一些事件处理的方法,是无法在服务端完成,因此需要将组件代码在浏览器中再执行一遍,这种服务器端和客户端共用一套代码的方式就称之为同构
重构通俗讲就是一套React代码在服务器上运行一遍,到达浏览器又运行一遍:
浏览器实现事件绑定的方式为让浏览器去拉取JS文件执行,让JS代码来控制,因此需要引入script标签
通过script标签为页面引入客户端执行的react代码,并通过express的static中间件为js文件配置路由,修改如下:
1
2
3
4
5
6
7
8
9
10
11
12
13
14
15
16
17
18
19
20
21
22
23
| import express from 'express'
import React from 'react'
import { renderToString } from'react-dom/server'
import Home from './src/containers/Home'
const app = express()
app.use(express.static('public'));
const content = renderToString(<Home/>)
app.get('/',(req,res)=>res.send(`
<html>
<head>
<title>ssr demo</title>
</head>
<body>
${content}
<script src="/index.js"></script>
</body>
</html>
`))
app.listen(3001, () =>console.log('Example app listening on port 3001!'))
|
然后再客户端执行以下react代码,新建webpack.client.js作为客户端React代码的webpack配置文件如下:
1
2
3
4
5
6
7
8
9
10
11
12
13
14
15
16
17
18
19
20
21
22
23
24
25
| const path = require('path')
module.exports = {
mode:'development',
entry:'./src/client/index.js',
output: {
filename:'index.js',
path:path.resolve(__dirname,'public')
},
module: {
rules: [{
test: /\.js?$/,
loader:'babel-loader',
exclude: /node_modules/,
options: {
presets: ['react','stage-0',['env', {
targets: {
browsers: ['last 2versions']
}
}]]
}
}]
}
}
|
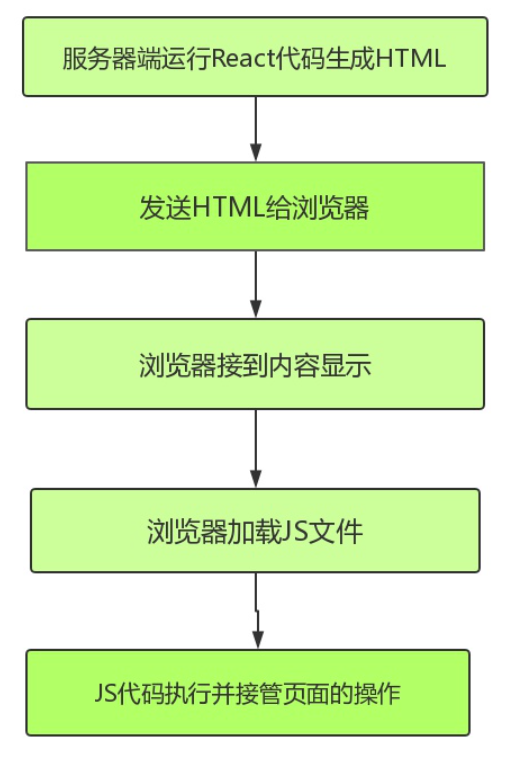
这种方法就能够简单实现首页的react服务端渲染,过程对应如下图:

在做完初始渲染的时候,一个应用会存在路由的情况,配置信息如下:
1
2
3
4
5
6
7
8
9
| import React from 'react'
import { Route } from 'react-router-dom'
import Home from './containers/Home'
export default (
<div>
<Route path="/" exact component={Home}></Route>
</div>
)
|
然后可以通过index.js引用路由信息,如下:
1
2
3
4
5
6
7
8
9
10
11
12
13
14
| import React from 'react'
import ReactDom from 'react-dom'
import { BrowserRouter } from'react-router-dom'
import Router from'../Routers'
const App= () => {
return (
<BrowserRouter>
{Router}
</BrowserRouter>
)
}
ReactDom.hydrate(<App/>, document.getElementById('root'))
|
这时候控制台会存在报错信息,原因在于每个Route组件外面包裹着一层div,但服务端返回的代码中并没有这个div
解决方法只需要将路由信息在服务端执行一遍,使用使用StaticRouter来替代BrowserRouter,通过context进行参数传递
1
2
3
4
5
6
7
8
9
10
11
12
13
14
15
16
17
18
19
20
21
22
23
24
25
26
27
28
29
30
31
32
33
| import express from 'express'
import React from 'react'
import { renderToString } from 'react-dom/server'
import { StaticRouter } from 'react-router-dom'
import Router from '../Routers'
const app = express()
app.use(express.static('public'));
app.get('/',(req,res)=>{
const content = renderToString((
<StaticRouter location={req.path} context={{}}>
{Router}
</StaticRouter>
))
res.send(`
<html>
<head>
<title>ssr demo</title>
</head>
<body>
<div id="root">${content}</div>
<script src="/index.js"></script>
</body>
</html>
`)
})
app.listen(3001, () => console.log('Exampleapp listening on port 3001!'))
|
这样也就完成了路由的服务端渲染
三、原理
整体react服务端渲染原理并不复杂,具体如下:
node server 接收客户端请求,得到当前的请求url 路径,然后在已有的路由表内查找到对应的组件,拿到需要请求的数据,将数据作为 props、context或者store 形式传入组件
然后基于 react 内置的服务端渲染方法 renderToString()把组件渲染为 html字符串在把最终的 html 进行输出前需要将数据注入到浏览器端
浏览器开始进行渲染和节点对比,然后执行完成组件内事件绑定和一些交互,浏览器重用了服务端输出的 html 节点,整个流程结束
参考文献


